Guaranteeing post-quantum encryption in the browser: ML-KEM over WebSockets
A technical walkthrough of how Project Eleven guarantees post-quantum encryption in browser-to-server communication using ML-KEM-768, WebSockets, and AES-256-GCM.

The Need for Post-Quantum Security in Transit
Up until the last few years, pretty much all web traffic was transmitted over channels that rely on elliptic curve cryptography (ECC) for key agreement. As ECC is quantum-vulnerable, this means that all of this web traffic may be subject to harvest now, decrypt later attacks. Thankfully, a hybrid key agreement scheme which utilizes both ECC and post-quantum methods can now be used in TLS 1.3. This key agreement method combines the typical X25519 Diffie–Hellman key exchange with the post-quantum key encapsulation method ML-KEM, resulting in the name X25519MLKEM768.
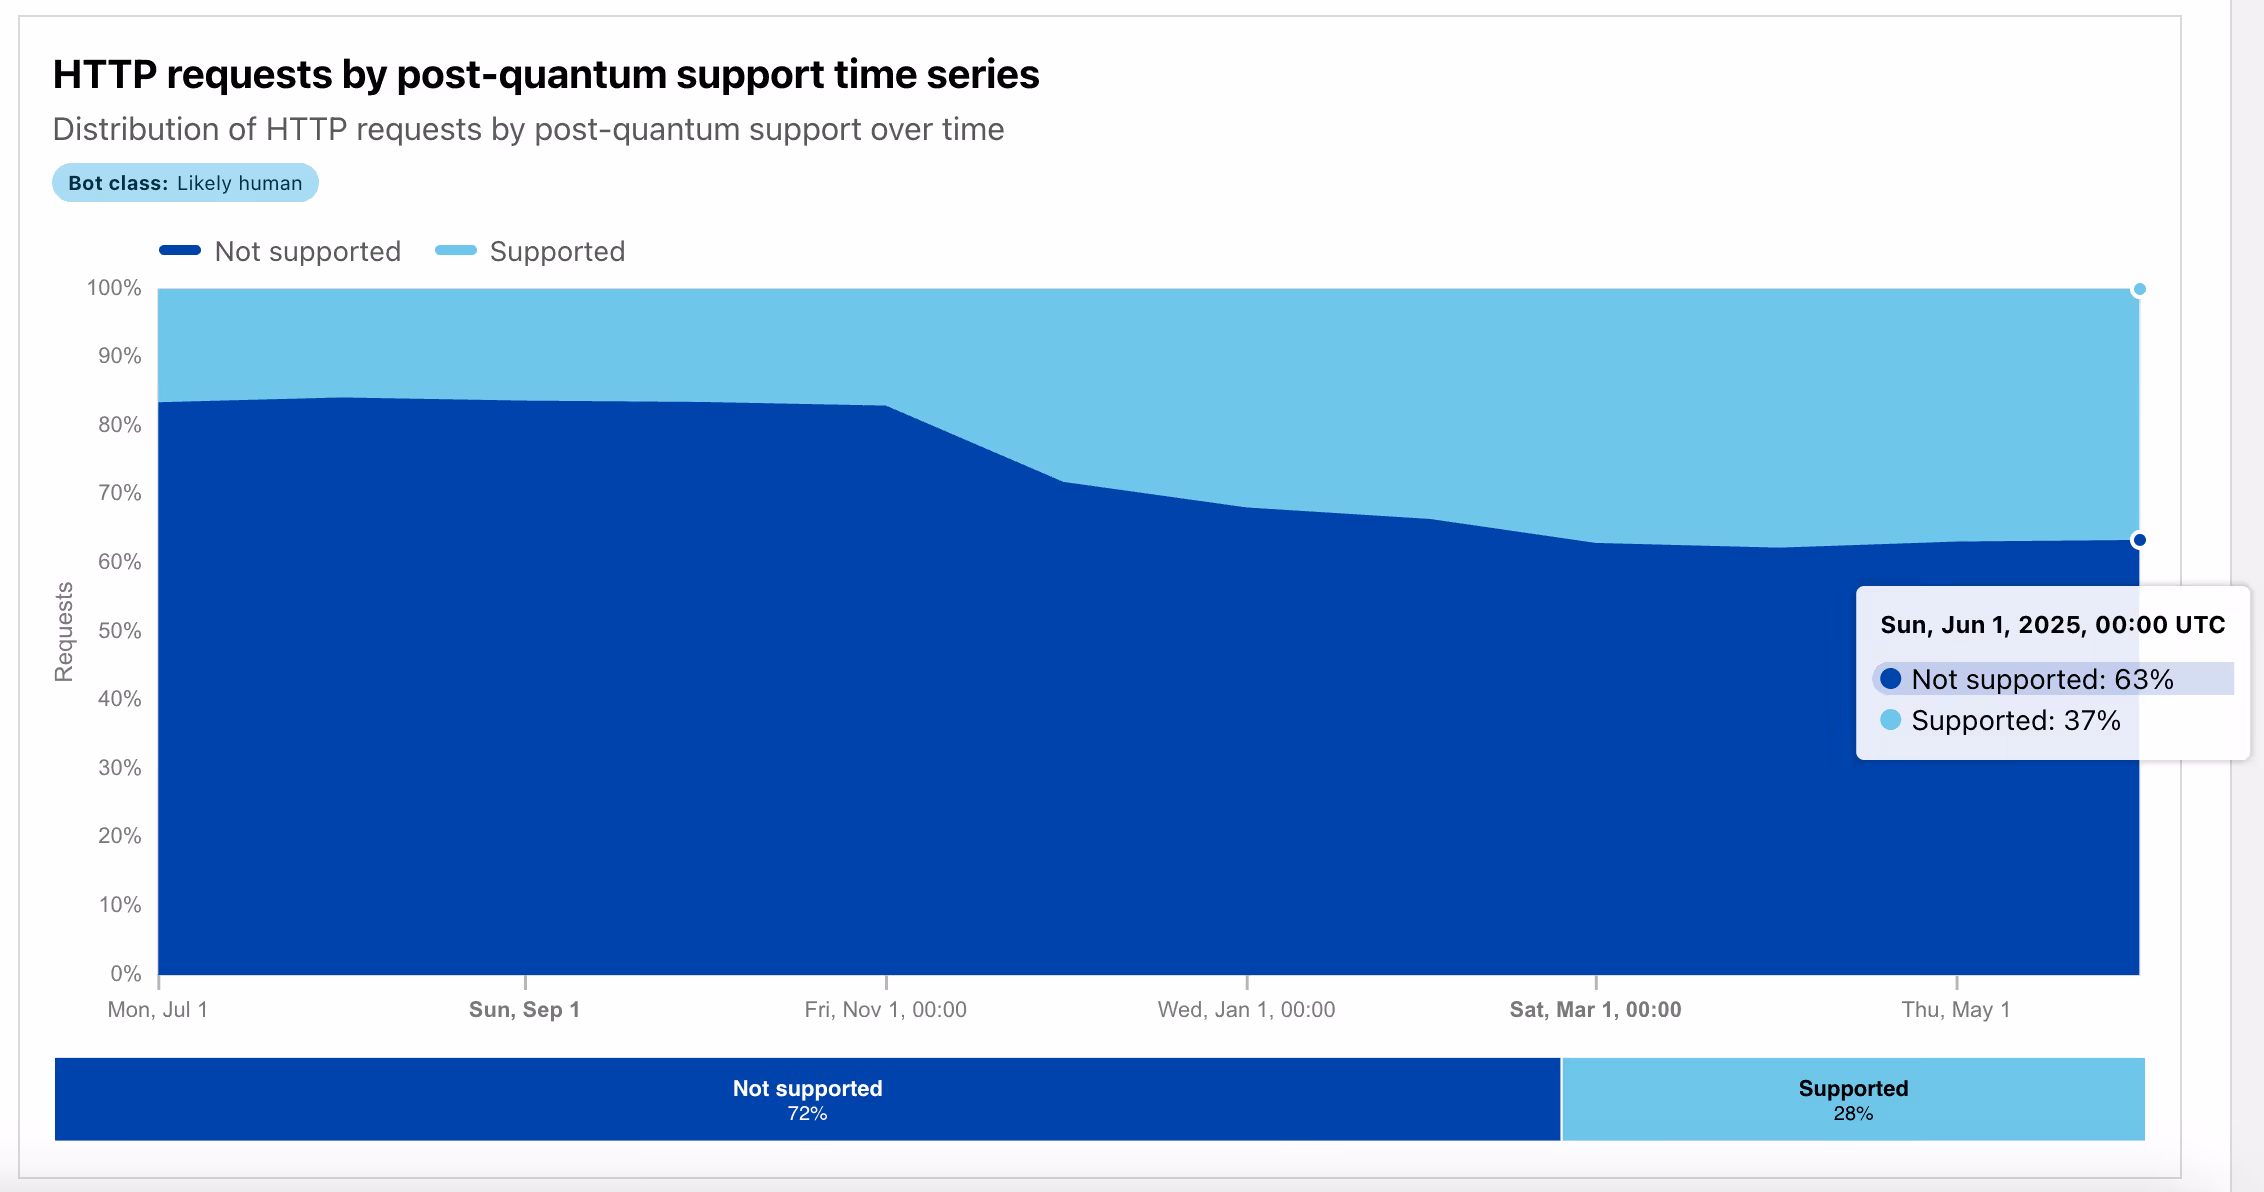
The simple approach to support post-quantum encryption for your web application is to upgrade your server’s TLS library to a version that supports X25519MLKEM768. Then you must hope that your users have secure, up-to-date browsers that have done the same upgrade. However, Cloudflare Radar’s latest reports show that only 37% of requests to Cloudflare are currently using X25519MLKEM768. So, taking this approach at present will secure less than half of your users.
So, what if you want to guarantee post-quantum encryption in transit for all of your users?
Our Solution: ML-KEM over WebSockets
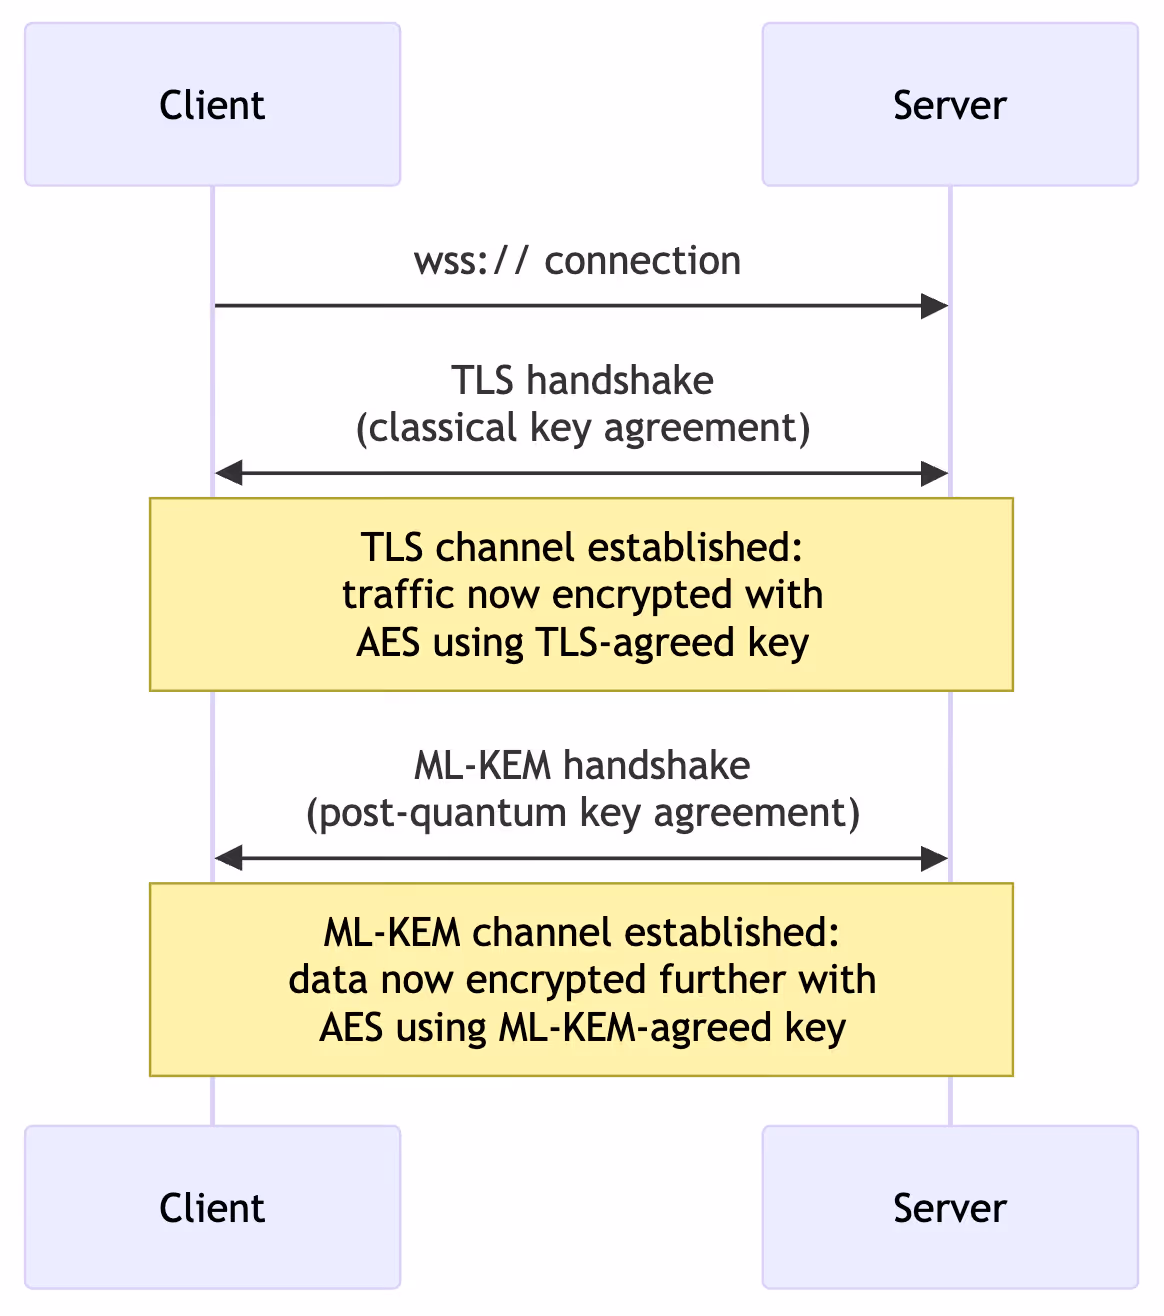
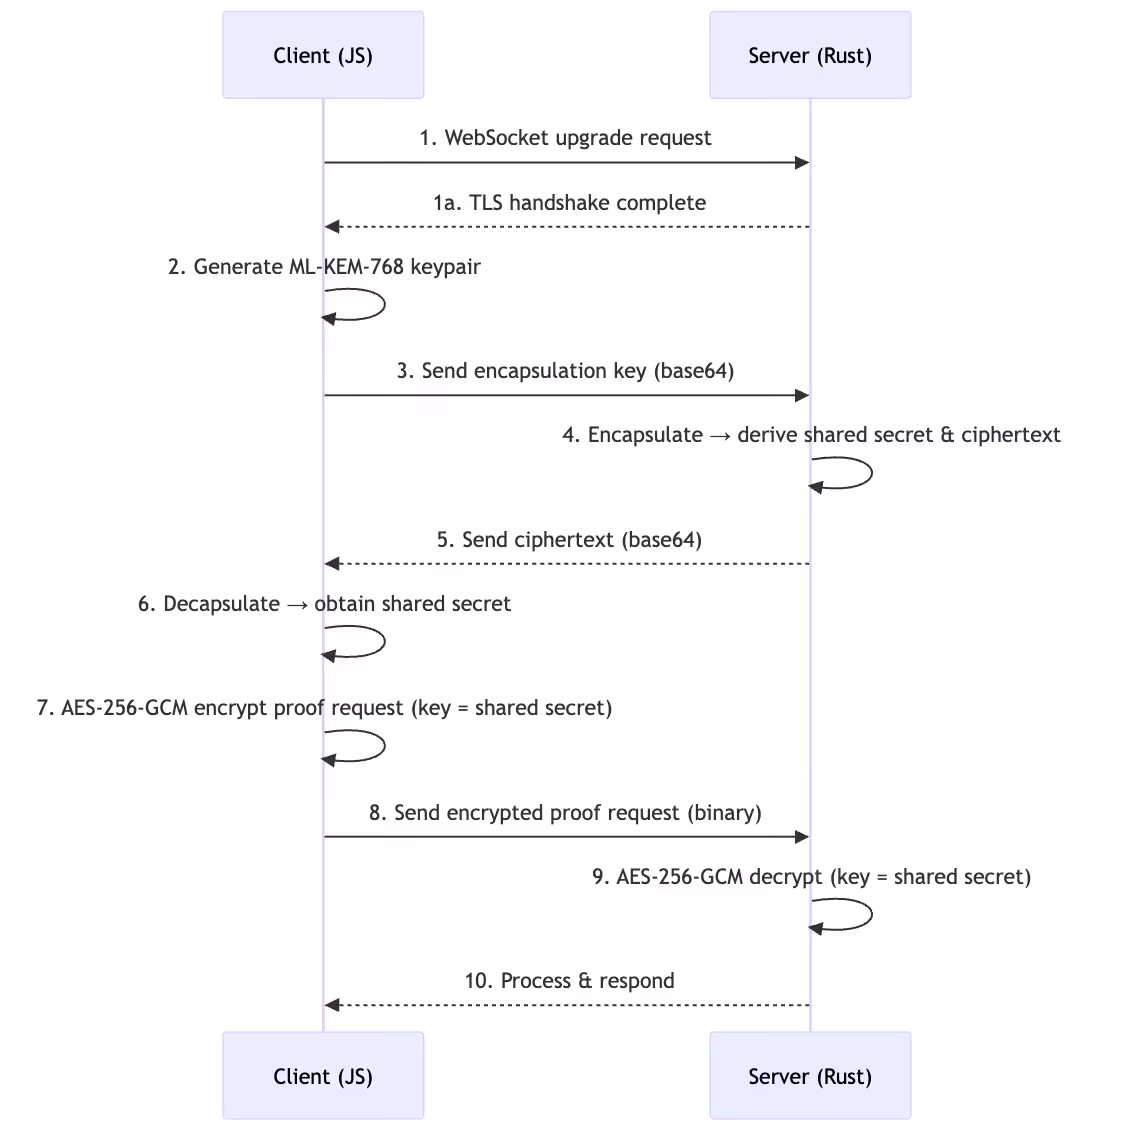
While building yellowpages, we wanted to guarantee post-quantum encryption for all of our users, while still allowing our application to be accessible from any browser. To achieve this, we decided to implement our own ML-KEM handshake over WebSockets. The initial connection is made from the browser to the server using a typical wss:// request, which results in TLS encryption, and then we do a further ML-KEM handshake at the application layer.
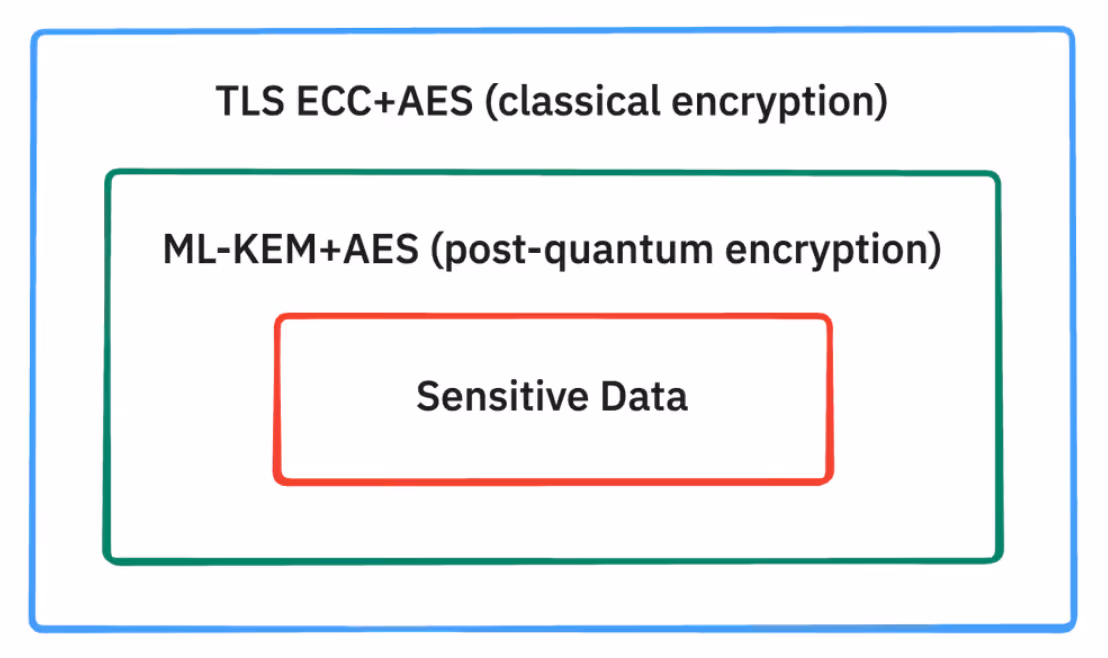
This guarantees hybrid post-quantum security, as we know that the TLS connection will encrypt the connection using at least ECC+AES, and that our client will further encrypt sensitive data using ML-KEM+AES. If an attacker harvests the data transmitted in our connections, they would need to break both ECC and ML-KEM to decrypt the sensitive data. We believe that a quantum attacker will someday be able strip away the ECC layer of this encryption, but there is no known quantum attack that could break through the ML-KEM layer.
Choosing Parameters
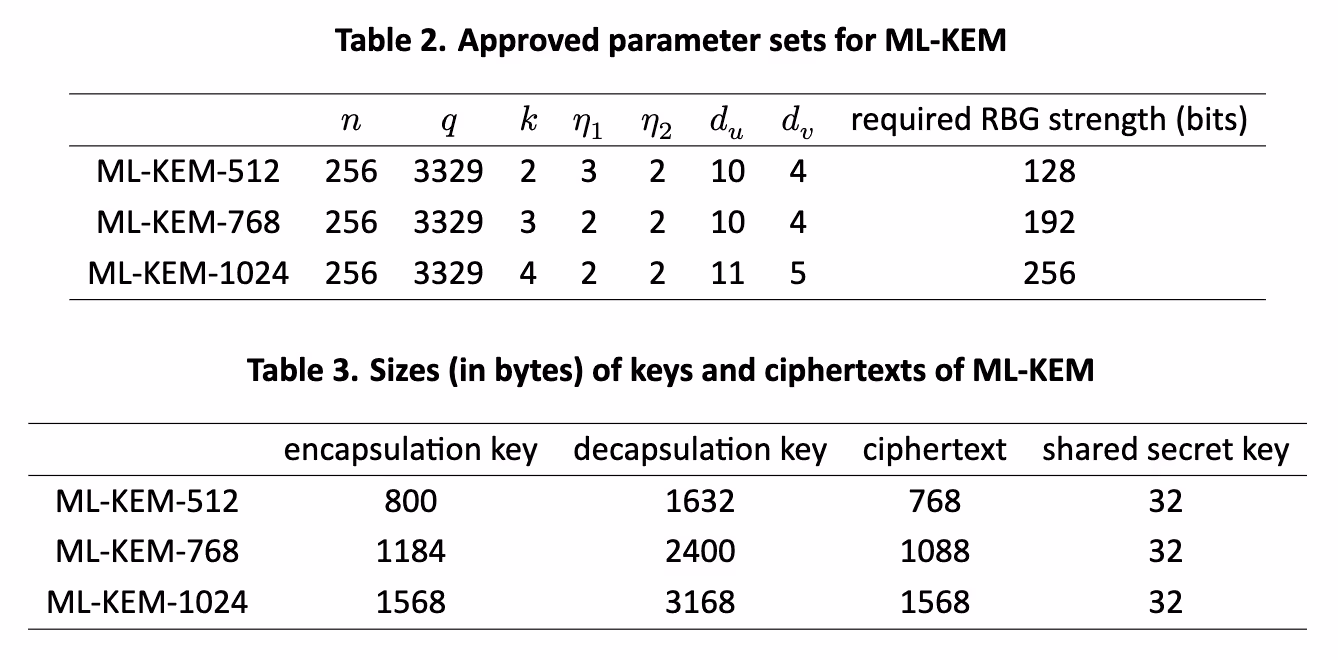
Before beginning the implementation, we needed to choose the parameter sets for ML-KEM and AES. ML-KEM has three parameter sets: 512, 768, and 1024. We opted for ML-KEM-768, because we want to prioritize a high degree of security (192 bits), and the parameters have a negligible impact on our application’s performance. TLS also opted for ML-KEM-768, which gives us some added peace of mind.
For AES, we chose the standard parameters of AES-GCM-256. AES may be subject to Grover’s algorithm eventually, which could bring the security of AES-256 down from 256 bits to 128 bits. We deem 128 bits of security sufficient, and for Grover’s to be much further away than the more imminent quantum threat of Shor’s algorithm.
Implementation
Time to dig into our open-source production code for the ML-KEM handshake over WebSockets. We use a typical browser-based JavaScript client and a Rust server that runs in an AWS Nitro Enclave. This section will be light on prose, as we’ll let the code speak for itself.
⚠️ Warning: Rolling your own crypto
This is a custom cryptography implementation that we needed to do for yellowpages. If you don’t need to guarantee post-quantum security, you’ll likely be better off taking the simple approach mentioned earlier – use the latest version of TLS, and hope that your users do the same. But if you want to take a custom approach like us, you should also get it audited to avoid implementation errors. We had ours audited by cure53.
Server: Host a WSS WebSockets endpoint
We use Axum for our Rust server, and they have excellent WebSocket support. We use Evervault Enclaves to host our server, and we use their TLS termination feature.
#[tokio::main]
async fn main() {
    ...

    let app = Router::new()
        .route("/prove", get(handle_ws_upgrade))
		    ...

    ...
}

pub async fn handle_ws_upgrade(
    State(config): State<Config>,
    ...
    ws: WebSocketUpgrade,
    ...
) -> impl IntoResponse {
    log::info!("Received WebSocket upgrade request");

		...

    ws.on_upgrade(move |socket| run_pq_channel_protocol(socket, config))
}Client: Establish WebSocket Connection with Server
We use the standard JavaScript WebSocket client.
const ws = new WebSocket(
	`${domains.proofService}/prove?...`
);Client: Generates ML-KEM Keypair
The client generates the ML-KEM keypair, using a trusted source of entropy. For ML-KEM-768, this keypair has a 1184 byte encapsulation key (public key) and a 2400 byte decapsulation key (private key). We chose noble-post-quantum for our JavaScript post-quantum cryptography, because noble libraries are the go-to for JavaScript Web3 projects, and there are currently no audited JavaScript libraries for post-quantum.
/// api.ts

mlKem768Keypair = generateMlKem768Keypair();

/// cryptography.ts

import { ml_kem768 } from '@noble/post-quantum/ml-kem';

...

function generateMlKem768Keypair(): MlKem768Keypair {
  try {
    const keyPair = ml_kem768.keygen();
    return {
      encapsulationKey: keyPair.publicKey,
      decapsulationKey: keyPair.secretKey
    };
  } catch (error) {
    ...
  }
}
Links to source code: api code, cryptography code
Client: Transmit Encapsulation Key to Server
We base64-encode the encapsulation key, and transmit it in a JSON message over the WebSocket connection.
const mlKem768EncapsulationKeyBase64 = base64.encode(
  mlKem768Keypair.encapsulationKey
);

// Step 3: Send handshake with ML-KEM-768 public key
const handshakeMessage: HandshakeMessage = {
  ml_kem_768_encapsulation_key: mlKem768EncapsulationKeyBase64
};
ws.send(JSON.stringify(handshakeMessage));
ws.send(JSON.stringify(handshakeMessage));
Server: Run Encapsulate Function
The server parses the received data and runs the ML-KEM encapsulate function. This function generates the 32 byte secret key which will be shared by both parties, and encrypts it using the provided encapsulation key. In ML-KEM-768, this produces a 1088 byte ciphertext. We chose RustCrypto’s ml_kem library for our Rust server, as there is currently no audited Rust ml_kem library, and we have good trust in RustCrypto’s implementation.
pub async fn run_pq_channel_protocol(mut socket: WebSocket, config: Config) {
    log::info!("WebSocket connection established");

    // Step 1: Perform handshake and get the shared secret
    let shared_secret = match perform_handshake(&mut socket).await {
        Ok(secret) => secret,
        ...
    };

    ...
}

async fn perform_handshake(socket: &mut WebSocket) -> Result<SharedKey<MlKem768>, WsCloseCode> {
    // Wait for message with a timeout
    let receive_result = with_timeout!(HANDSHAKE_TIMEOUT_SECS, socket.recv(), "Handshake message");

    ...

    // Parse handshake message
    let handshake_request: HandshakeMessage = ok_or_bad_request!(
        serde_json::from_str(&handshake_text),
        "Failed to parse handshake message JSON"
    );

    ...

    // Decode the base64 encapsulation key from the client
    let encapsulation_key_bytes = ok_or_bad_request!(
        base64.decode(&handshake_request.ml_kem_768_encapsulation_key),
        "Failed to decode base64 encapsulation key"
    );

    ...

    // Generate the shared secret and ciphertext
    let mut rng = StdRng::from_entropy();
    let Ok((ciphertext, shared_secret)): Result<(Ciphertext<MlKem768>, SharedKey<MlKem768>), _> =
        encapsulation_key.encapsulate(&mut rng)
    else {
        ...
    };

    ...
}
🔐 At this point, the server has the ML-KEM-agreed secret key which will be possessed by both parties, and no one else.
Server: Transmit the Ciphertext back to the Client
We base64-encode the ciphertext, and transmit it back to the client in JSON over the WebSocket.
async fn perform_handshake(socket: &mut WebSocket) -> Result<SharedKey<MlKem768>, WsCloseCode> {
    ...

    // Encode the ciphertext to base64
    let ciphertext_base64 = base64.encode(ciphertext);

    // Create and send the response
    let handshake_response = HandshakeResponse {
        ml_kem_768_ciphertext: ciphertext_base64,
        auth_attestation_doc,
    };

    ...

    ok_or_internal_error!(
        socket.send(WsMessage::Text(response_json.into())).await,
        "Failed to send handshake response"
    );

    ...
}Client: Decapsulate the Ciphertext
The client parses the received ciphertext, and runs the ML-KEM decapsulate function on it using the decapsulation key. This decrypts the ciphertext to uncover the shared secret.
/// api.ts

const handshakeResponse = await raceWithTimeout<HandshakeResponse>(...);

// Step 5: Validate and decode the ciphertext
const mlKem768CiphertextBase64 = handshakeResponse.ml_kem_768_ciphertext;

...

// Decode base64 to bytes
const mlKem768CiphertextBytes = base64.decode(
  mlKem768CiphertextBase64
) as MlKem768CiphertextBytes;


/// cryptography.ts

mlKemSharedSecret = deriveMlKem768SharedSecret(
  mlKem768CiphertextBytes,
  mlKem768Keypair
);

...

function deriveMlKem768SharedSecret(
  ciphertextBytes: MlKem768CiphertextBytes,
  keypair: MlKem768Keypair
): Uint8Array {
  ...

  try {
	  ...

	  // Derive the shared secret
	  sharedSecret = ml_kem768.decapsulate(
	    ciphertextBytes,
	    keypair.decapsulationKey
	  );

	  ...

	  return sharedSecret;
	}
  ...
}
Links to source code: api.ts, cryptography.ts
🔐 At this point, the client also has the ML-KEM-agreed secret key
Client: AES-Encrypt All Sensitive Data Using Shared Secret Key
From now on, the client is safe to transmit sensitive data to the server, provided they AES-encrypt the data using the agreed secret key. We chose to use noble-ciphers for AES in JavaScript, which has been audited.
/// api.ts

const aes256GcmEncryptedMessage = encryptProofRequestData(
  proofRequestBytes,
  mlKem768Keypair,
  mlKem768CiphertextBytes
);

...

// Send the encrypted proof request as a binary message
ws.send(aes256GcmEncryptedMessage);

/// cryptography.ts

function encryptProofRequestData(
  requestBytes: ProofRequestBytes,
  mlKem768Keypair: MlKem768Keypair,
  mlKem768CiphertextBytes: MlKem768CiphertextBytes
): Uint8Array {
  ...

  try {
    // Derive the shared secret
    mlKemSharedSecret = deriveMlKem768SharedSecret(
      mlKem768CiphertextBytes,
      mlKem768Keypair
    );

    ...

    // Generate a random 96-bit (12-byte) nonce for AES-256-GCM
    aes256GcmNonce = randomBytes(AES_256_GCM_NONCE_SIZE);

    // Encrypt using AES-256-GCM with the ML-KEM derived shared secret as key
    const aes256Gcm = gcm(mlKemSharedSecret, aes256GcmNonce);
    const aes256GcmCiphertext = aes256Gcm.encrypt(requestBytes);

    // Combine nonce and encrypted data into a single buffer
    // Format: [12 bytes nonce][N bytes ciphertext]
    const aes256GcmEncryptedMessage = new Uint8Array(
      AES_256_GCM_NONCE_SIZE + aes256GcmCiphertext.length
    );
    aes256GcmEncryptedMessage.set(aes256GcmNonce);
    aes256GcmEncryptedMessage.set(aes256GcmCiphertext, AES_256_GCM_NONCE_SIZE);

    return aes256GcmEncryptedMessage;
  }
  ...
}
Links to source code: api.ts, cryptography.ts
Server: AES-decrypt Sensitive Data using Shared Secret Key
The server can use AES-256-GCM to decrypt the data transmitted by the client. We chose to use RustCrypto’s aes-gcm crate, which has been audited.
pub async fn run_pq_channel_protocol(mut socket: WebSocket, config: Config) {
    ...

    // Step 2: Receive the proof request
    let proof_request = match receive_proof_request(&mut socket, shared_secret).await {
        Ok(request) => request,
        ...
    };

    ...
}

...

async fn receive_proof_request(
    socket: &mut WebSocket,
    shared_secret: SharedKey<MlKem768>,
) -> Result<ProofRequest, WsCloseCode> {
    // Wait for message with a timeout
    let receive_result = with_timeout!(PROOF_REQUEST_TIMEOUT_SECS, socket.recv(), "Proof request");

    ...

    // Extract nonce and ciphertext
    let (aes_256_gcm_nonce_bytes, aes_256_gcm_ciphertext) =
        aes_256_gcm_encrypted_data.split_at(AES_GCM_NONCE_LENGTH);
    let aes_256_gcm_nonce = Aes256GcmNonce::from_slice(aes_256_gcm_nonce_bytes);

    ...

    // Create AES-GCM cipher using the shared secret
    let aes_256_gcm_key = Aes256GcmKey::<Aes256Gcm>::from_slice(&shared_secret);
    let aes_256_gcm_cipher = Aes256Gcm::new(aes_256_gcm_key);

    // Decrypt the data
    let decrypted_bytes = ok_or_bad_request!(
        aes_256_gcm_cipher.decrypt(aes_256_gcm_nonce, aes_256_gcm_ciphertext),
        "Failed to decrypt proof request"
    );

    ...
}Conclusion
This guarantees post-quantum security in transit for all yellowpages users! If you want to try it out, you can register to yellowpages and open Firefox’s network tab to view the WebSocket messages.
Here’s the full flow from start to finish:
If this post sparked your curiosity, you'll love our newsletter.
Join thousands of readers tracking the latest breakthroughs in quantum computing and cryptography.
Subscribe here: https://www.projecteleven.com/subscribe.
Related articles
A new lattice-based HD wallet construction restores BIP32-style key derivation, enabling post-quantum wallets to support xpubs, watch-only infrastructure, and hierarchical key management.


